Registration and distribution matrix
Page's last update : 04 Feb 2025
FAQ
Your module is greyed out?
- To get access to this module, please ask your e-file local administrator to make you member of the Distribution matrix and Registration matrix groups.
How can I batch upload registration or distribution statuses? Can I bulk upload multiple registration/distribution statuses in one go?
- Registration statuses can be uploaded by providing a .csv file with the following columns to rs.clientsupportoperations@fundsquare.net: ISIN;Country;Status;effective date (not mandatory).
- Example:
- LU1234567890;BE;R
- LU2124567890;DE;RX;24/01/24
- LU1231231234;FR;DX
Why has the Distribution Status not been updated to Registered ('R') despite the R to D automation?
- If the current distribution status is DX, it will not be updated by an automation and has to be updated manually. Please also note that the automation only works for countries with a filing setup.
I can not find a closed share-class in the registration matrix
- Please make sure filter status "closed" is selected
Why does the registration or the distribution matrix appear to be empty?
- This is due to missing access rights. The latter have to be requested by email to rs.clientsupportoperations@fundsquare.net
How can I add a new country to the registration matrix?
- New countries can be added by clicking on the Manage Country button available on the top of the page
How can I see the audit trail of a registration or distribution status?
- Please click on the "clock" symbol
How can I extract a registration matrix?
- Registration and distribution extracts are available in the "reports" section of the registration and distribution matrix module
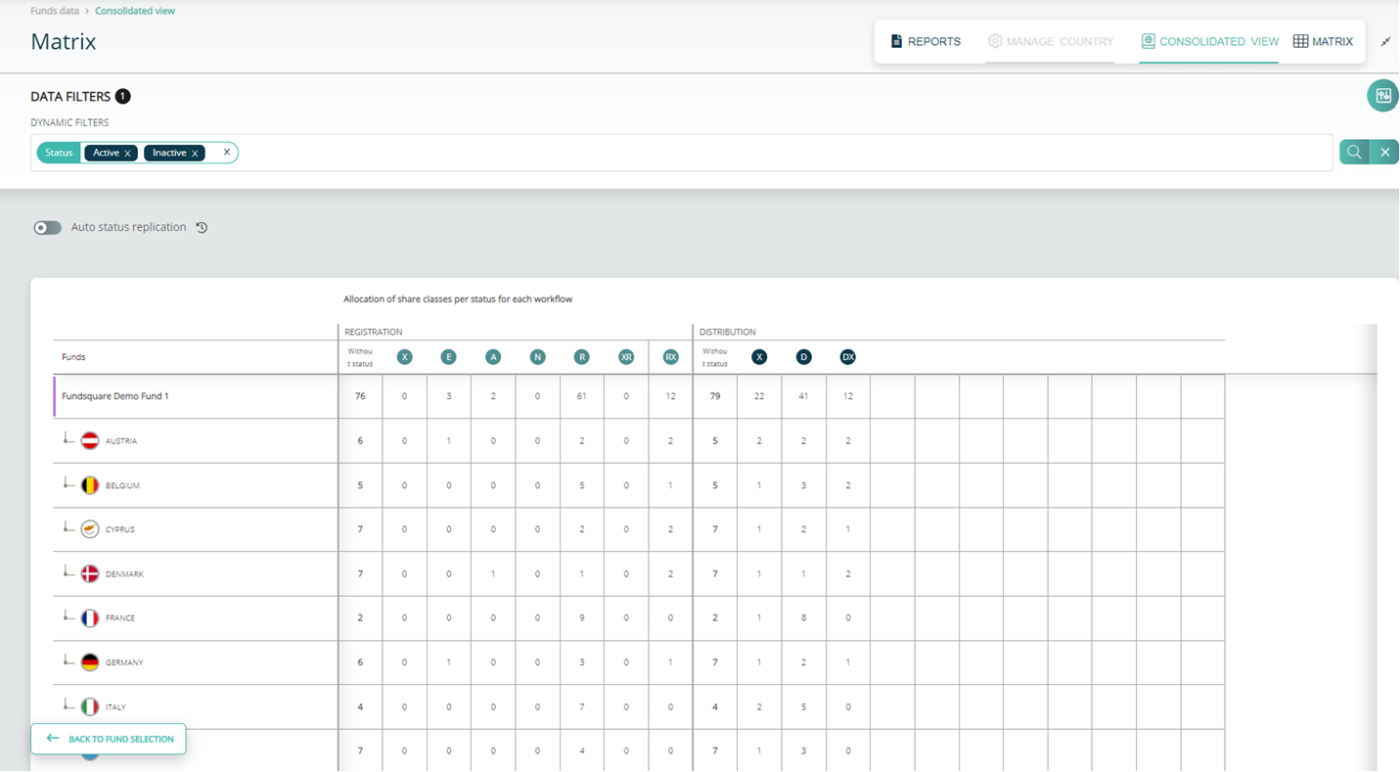
Can we see the number of shares with status by country ?
- Yes, please click on the consolidated view tab in the registration and distribution matrix module
What does this button mean?
- This button allows to select all statuses at fund or umbrella level
Why is there one or more country(ies) missing in my registration matrix extract?
- The extract shows only the countries that you are filing entity for. As the registration matrix is not a stand alone product, you have to use the filing workflow(s) in order to be able to extract registration statuses.
Why has my passporting been rejected?
- Passporting rejection: The date of the document does not match the date of the last document registered at the CSSF. What should we do ?
- The document added to the notification package does not bear the same reference date than the latest version of this document filed at the CSSF
- Passporting rejection: The date of the document does not match the date of the last document registered at the CSSF. What should we do ?
- Passporting rejection: "DOCREP-O00008456-00000003-0000-2023-06-30-SR-EN-0000.pdf, The indexation level and the type of document are not compatible"
- A document has not been indexed at the appropriate level. Semi-annual and annual reports, Articles of incorporation, prospectus and payment information have to be indexed on fund level and not on sub-fund nor on class level
- Passporting rejection: "DOCREP-O00008456-00000003-0000-2023-06-30-SR-EN-0000.pdf, The indexation level and the type of document are not compatible"
- Passporting rejection: "The contact person email address doesn't correspond to an user of the eDesk entity corresponding to the contact entity defined.
- The rejection message from the CSSF is related to the contact e-mail address you insert in the pop-up before sending the notification: This contact e-mail should be identical to the one registered in eDesk.
- Passporting rejection: "The contact person email address doesn't correspond to an user of the eDesk entity corresponding to the contact entity defined.
- "Where can I find an already started passporting/country registration notification?
- Where can I find an partically completed passporting/country registration notification?"
- Started passportings can be found in the Notification process tab, in the dynamic filter, "My Notification in progress"
Description
Selecting a fund
![]() Click on the FILTER button
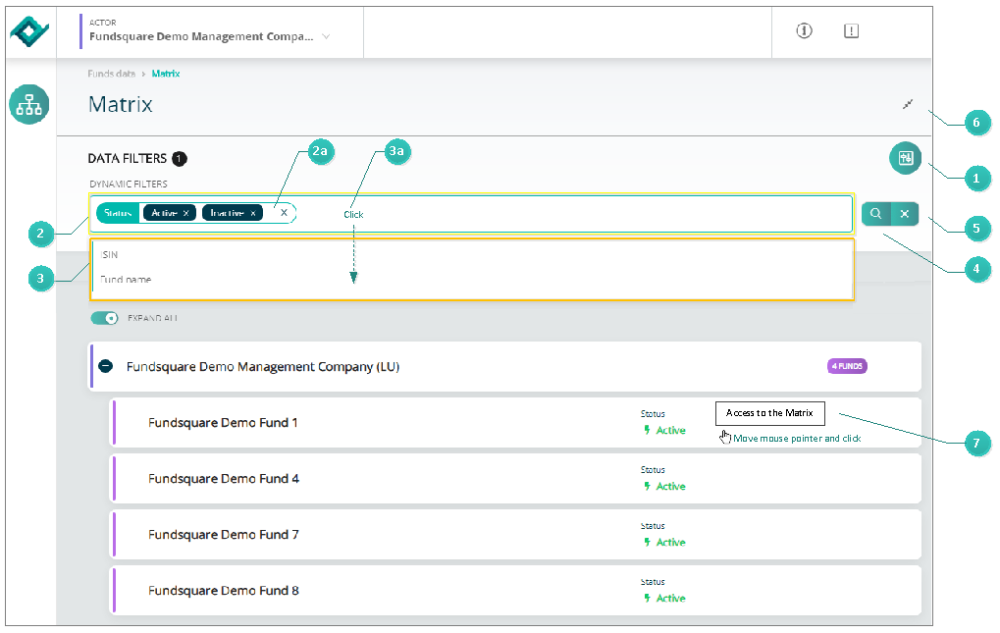
Click on the FILTER button ![]() on the right side of the screen. The DYNAMIC FILTERS taskbar (highlighted in yellow) with a Status area
on the right side of the screen. The DYNAMIC FILTERS taskbar (highlighted in yellow) with a Status area ![]() opens, where you can filter the funds by their status (Active, inactive, closed).
opens, where you can filter the funds by their status (Active, inactive, closed).
![]() Active and Inactive funds are displayed by default. If you want for example display Closed funds as well, open the drop-down list by clicking inside the STATUS area
Active and Inactive funds are displayed by default. If you want for example display Closed funds as well, open the drop-down list by clicking inside the STATUS area ![]() , select Closed and press the Search button
, select Closed and press the Search button ![]() .
.
![]() You can narrow your search criteria by using ISIN and Fund name filters. Click inside the toolbar
You can narrow your search criteria by using ISIN and Fund name filters. Click inside the toolbar ![]() (highlighted in yellow). A drop-down list (highlighted in orange) opens.
(highlighted in yellow). A drop-down list (highlighted in orange) opens.
Select the ISIN and /or Fund name filter that will then be added to the DYNAMIC FILTERS taskbar (highlighted in yellow), see figure below.
These two filter options will allow you to search for example for a specific share class of a fund by its ISIN or Fund name (The Containing and Begin functions are included as well).
![]() Press the SEARCH button
Press the SEARCH button ![]() to initiate the search process.
to initiate the search process.
![]() Press the RESET button
Press the RESET button ![]() to clear all filters and start a new search.
to clear all filters and start a new search.
![]() Press the Expand DATA FILTERS icon to hide/display the DATA FILTERS taskbar.
Press the Expand DATA FILTERS icon to hide/display the DATA FILTERS taskbar.
![]() Move your mouse pointer over the fund area and click to open the Matrix screen.
Move your mouse pointer over the fund area and click to open the Matrix screen.
Matrix
![]() Click on the FILTER button
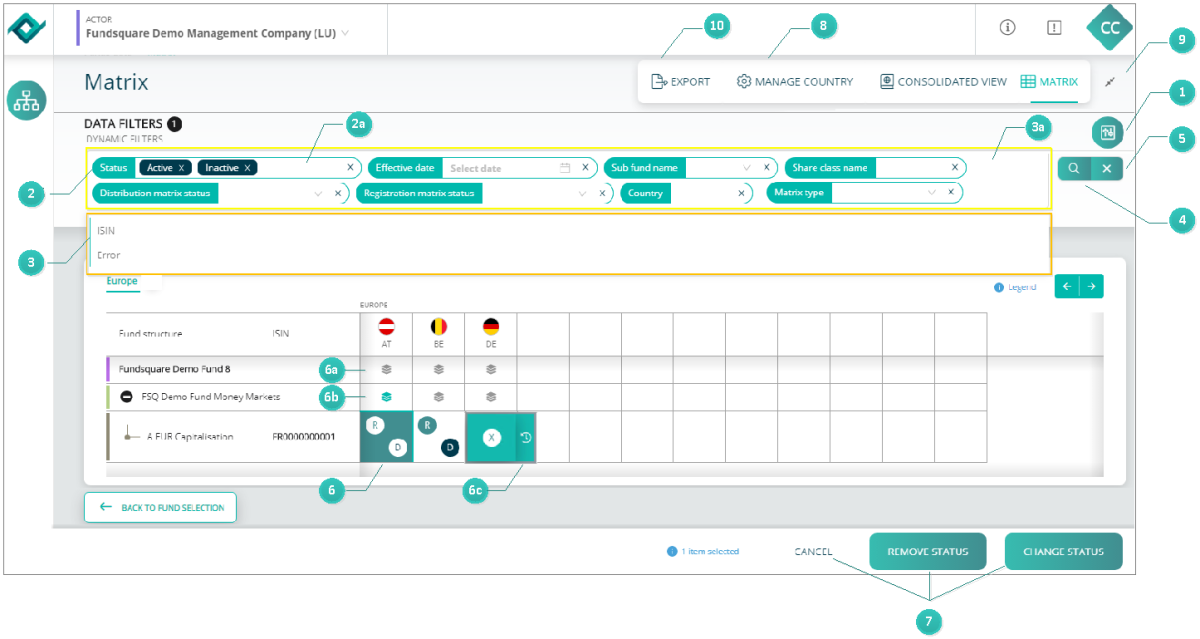
Click on the FILTER button ![]() on the right side of the screen. The DYNAMIC FILTERS taskbar (highlighted in yellow) with a Status area
on the right side of the screen. The DYNAMIC FILTERS taskbar (highlighted in yellow) with a Status area ![]() opens. Here you can filter the funds by their status (Active, inactive, closed).
opens. Here you can filter the funds by their status (Active, inactive, closed).
![]() Active and Inactive funds are displayed by default. If you want to view Closed funds as well, open the drop-down list by clicking inside the STATUS area
Active and Inactive funds are displayed by default. If you want to view Closed funds as well, open the drop-down list by clicking inside the STATUS area ![]() , select Closed and press the Search button.
, select Closed and press the Search button.
![]() Various filters are available to narrow further your search criteria. Click inside the toolbar
Various filters are available to narrow further your search criteria. Click inside the toolbar ![]() (highlighted in yellow). A drop-down list (highlighted in orange) containing the following filter options, opens:
(highlighted in yellow). A drop-down list (highlighted in orange) containing the following filter options, opens:
Matrix type - Distribution matrix status - Registration matrix status – Country – ISIN - Share class name - Sub fund name - Effective date – Error
Click on the filter options you need. They will be automatically added to DYNAMIC FILTERS taskbar ![]() highlighted in yellow.
highlighted in yellow.
![]() Press the SEARCH button to initiate the search process once you have entered your filter options.
Press the SEARCH button to initiate the search process once you have entered your filter options.
![]() Press the RESET button to clear all filters and start a new search.
Press the RESET button to clear all filters and start a new search.
![]() When a status box is selected, it is highlighted in green and the CANCEL, REMOVE STATUS and CHANGE STATUS buttons are activated
When a status box is selected, it is highlighted in green and the CANCEL, REMOVE STATUS and CHANGE STATUS buttons are activated ![]() .
.
To select all share classes of a fund, click the box ![]() at fund level. To select all share classes of a sub-fund, click the box
at fund level. To select all share classes of a sub-fund, click the box ![]() at sub-fund level.
at sub-fund level.
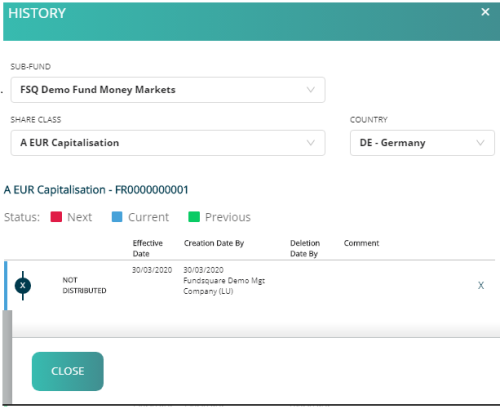
These functions allow you to add / update several share class simultaneously, provided the same status is required for each share class. All historical changes are registered and you can view them by clicking on the small clock icon ![]() . The HISTORY drawer opens on the right side of the screen,see figure below.
. The HISTORY drawer opens on the right side of the screen,see figure below.
![]() CANCEL, REMOVE STATUS and CHANGE STATUS buttons
CANCEL, REMOVE STATUS and CHANGE STATUS buttons
CANCEL : to cancel your previous selection press the CANCEL button.
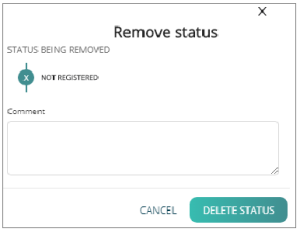
REMOVE STATUS : to delete a status press the DELETE STATUS button. A small window pops up, where you have to confirm your deletion, see figure below.
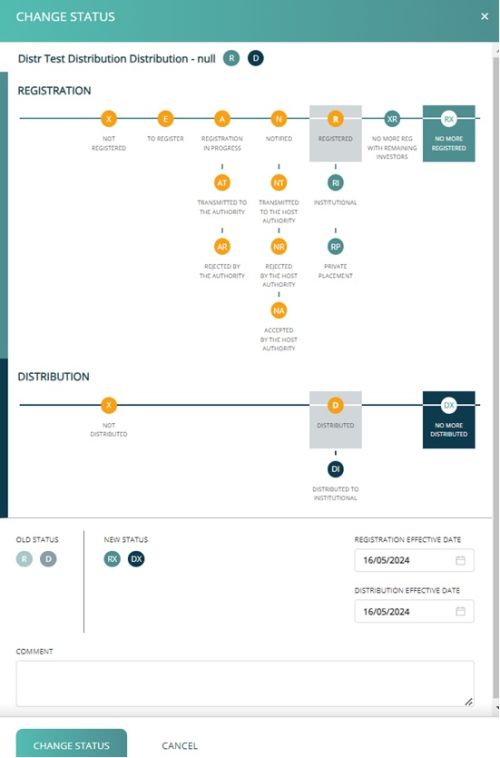
CHANGE A REGISTRATION AND/OR DISTRIBUTION STATUS : To update a registration/distribution status, please select one or more statuses (by clicking on the status) and select the CHANGE STATUS button. A pop up opens on the right side of the screen. The below screen shot shows a change from R and D to RX and DX: Select the new status, add an effective date (not mandatory) and a comment and hit the CHANGE STATUS button.
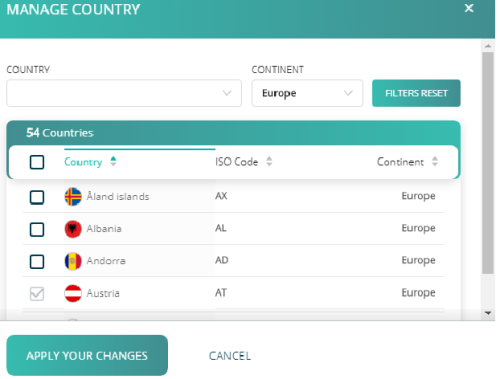
![]() Press the MANAGE COUNTRY button to add or remove countries. A drawer MANAGE COUNTRY opens on the right side of the screen, where you have to check / uncheck boxes in order to add / remove countries. Filter country and Filter continent are available to ease the search, see figure below.
Press the MANAGE COUNTRY button to add or remove countries. A drawer MANAGE COUNTRY opens on the right side of the screen, where you have to check / uncheck boxes in order to add / remove countries. Filter country and Filter continent are available to ease the search, see figure below.
![]() Open Full screen mode. Filter taskbars will be hidden.
Open Full screen mode. Filter taskbars will be hidden.
![]() You can also export the complete matrix to Excel and view the status details, ISIN by ISIN, country by country. Press the Export button.
You can also export the complete matrix to Excel and view the status details, ISIN by ISIN, country by country. Press the Export button.
Registration statuses
Please be informed that no changes have been made to the registration statuses rules.
The Registration status informs you whether your fund is registered with the European authorities or not.
![]() Status manually set through the Registration and distribution matrix module
Status manually set through the Registration and distribution matrix module
![]() Status set through the Notification module (automatically) or manually (cannot be deleted if set through the Notification module)
Status set through the Notification module (automatically) or manually (cannot be deleted if set through the Notification module)
![]() Status automatically set through the Notification module (cannot be deleted through the Registration and distribtuion matrix module)
Status automatically set through the Notification module (cannot be deleted through the Registration and distribtuion matrix module)
X - Not registered
E - To be registered
A - Registration in progress (selection of an instrument at step 2 of the Notification)
- AT - Registration in progress - Transmitted to the authority
- AR - Registration in progress - Rejected by the authority
N - Notified
- NT - Notified - Transmitted to the HOST authority
- NR - Notified - Rejected by the HOST authority
- NA - Notified - Accepted by the HOST authority
R - Registered
- RI - Registered - Institutional
- RP - Registered - Private placement
XR - No more registered but with remaining investors
RX - No more registered
Important information:
When a Luxembourg fund is notified through the e-file notification module, the matrix is automatically updated.
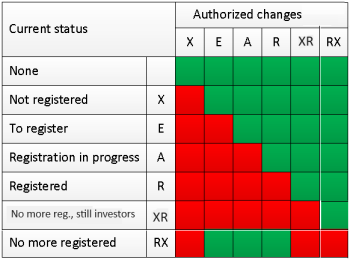
Authorization table for Registration statuses
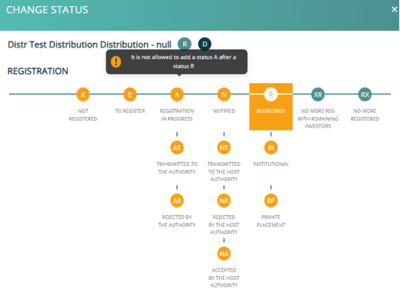
Example:: It is not allowed to replace a current status R by a status A.
Some controls have been added to assist you in maintaining consistency between the registration and distribution.
- To insert a DI, you must have a RI (except for Switzerland).
- To insert a D, you must have a R.
- To insert a XR, you must have a DX.
Distribution statuses
Please be informed that no changes have been made to the registration statuses rules.
The Distribution informs you whether your fund is distributed or not.
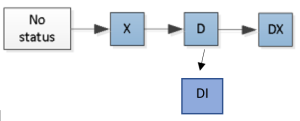
X - Not distributed
D - Distributed
DI – Distributed - Institutional
DX - No more distributed
Exception: For Switzerland only, dissemination of documents will be possible with a status DI even if the share class is not registered (Registration Status X). For the other countries, the dissemination will work ONLY if there is a Registration Status R or RI inserted.
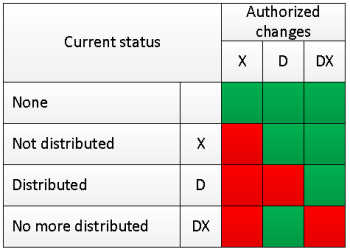
Authorization table for Distribution statuses
Example:: It is not allowed to replace a current status D by a status X.
Some controls have been added to assist you in maintaining consistency between the registration and distribution.
- To insert a DI, you must have a RI (except for Switzerland).
- To insert a D, you must have a R.
- To insert a XR, you must have a DX.
Consolidated view
Error messages
Should you try to insert an unauthorized registration or distribution status, an error message will appear in a pop up while you hover over the status
