Sending Service
Operating principle
The Sending Service is our solution for the automatic transmission of reports and documents to authorities.
This solution is useful if you have a large number of reports to submit or if the manual sending does not suit your needs.
Please be aware that, in this case you will have to provide the files yourself according to the authorities' file specifications.
This tool is compatible with most of the current operating systems (Windows / Unix / Linux) and is usually installed on a server on your side.
With a suitable network mapping, users can simply drop the file to be sent into the appropriate directory.
The file is then automatically encrypted and sent.
Prerequisites
- Internet access
- Java version 1.8
- If you use a proxy, authorize outgoing calls to www.e-file.lu. Ports 80 (HTTP) and 443 (HTTPS) must be open.
- Administrator rights to install the Sending Service on the computer (Windows Start button > Control Panel > User Accounts > Manage User Accounts).
- OS: Windows or Linux
- Processor: Pentium 2 GHz or equivalent
- 1 GB of RAM
- 1 GB of free space on hard disk drive if the files are downloaded by ftp. If files are locally stored, provide a free space of above 100 MB or a regular purges.
- 1 GB of free space on hard disk drive for logs. Regular purges are necessary as well.
- A Sending Service user , for example: aacSD, and its password, for example: formation, have to be available => e-file administrator.
- The e-file account of the Sending Service user has to be linked to groups/modules, for example FATCA reporting + profile "Sending Service".
- A valid keystore (keystore.ks) and its password must be available
- The Sending Service user has to be properly configured in the e-file user administration tool in order to be able to receive alerts (receipt of acknowledgement and feedback files).
Installation / update with Sending Service Installer
The Sending Service Installer is a tool that helps you install or configure quickly your Sending Service.
It can be downloaded from these links:
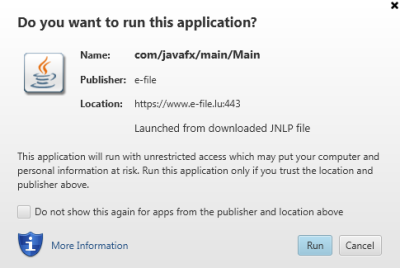
Once you have downloaded the application you will have to run it with Java by clicking the Run button.
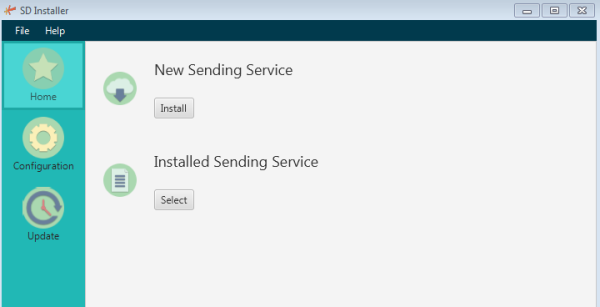
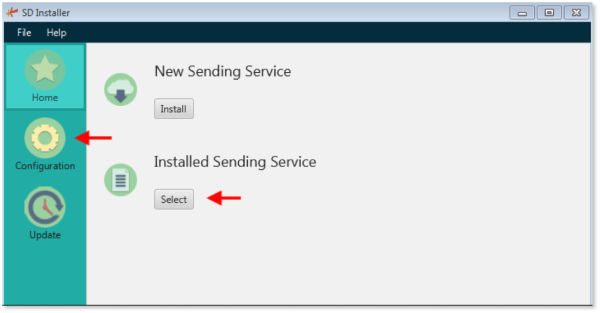
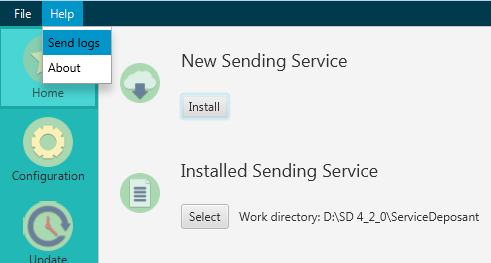
The front page of the Sending Service Installer opens and shows you the different functionalities you can select:
- Install a new Sending Service
- Configure an existing Sending Service
- Update an existing Sending Service
- Send logs
Installation
Controls before installation:
- Check that the connected user is administrator of the computer
- Have an e-file Sending service user (login and password) (e.g. : aacSD)
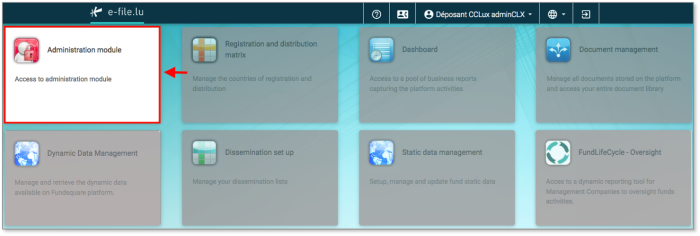
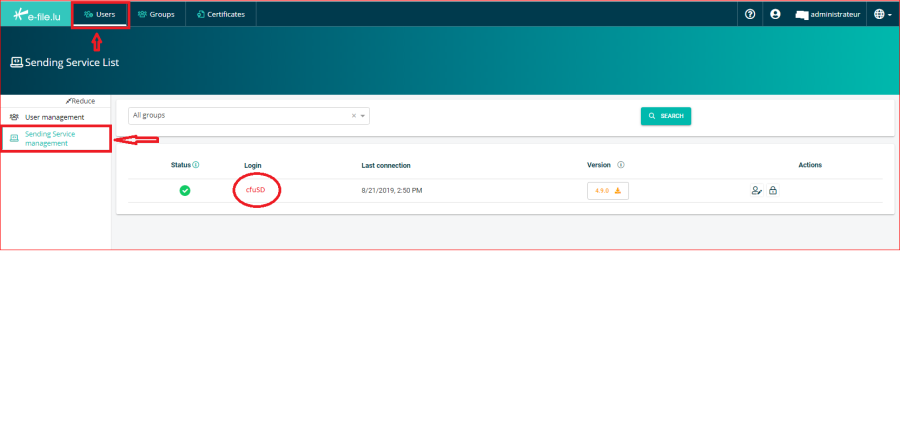
To check whether a Sending service user exists, log on as an e-file administrator. Step 2:
Click the Administration module
The user linked to the Sending Service usually follows the bellow naming rules : three letters referring to the company (in lower case) following by "SD" in upper case. (e.g. : aacSD)
If the user doesn't exist, please contact us.
Start installation:
To install a new Sending Service, click on the button Install on the front page.
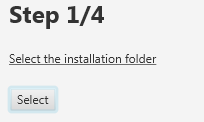
Step 1: Select the folder where you want to install your Sending Service.
Step 2: The Sending Service is downloaded and saved in the selected folder.
Step 3: Select the keystore file, containing your LuxTrust certificate.
Step 4: The Sending Service is ready to be configured. By clicking the Configuration button, you will be redirected to the Configuration menu of the .properties file.
Configuration
To configure an existing Sending Service you have to select the folder where it is stored and click on the Configuration button.
The configuration of an existing Sending Service is similar to a new Sending Service.
IMPORTANT: each time you make changes to the properties (configuration) file, you have to stop the Sending Service before, make your changes and then install the Sending Service again.
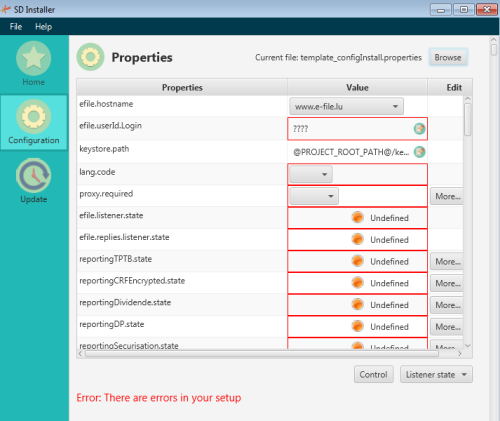
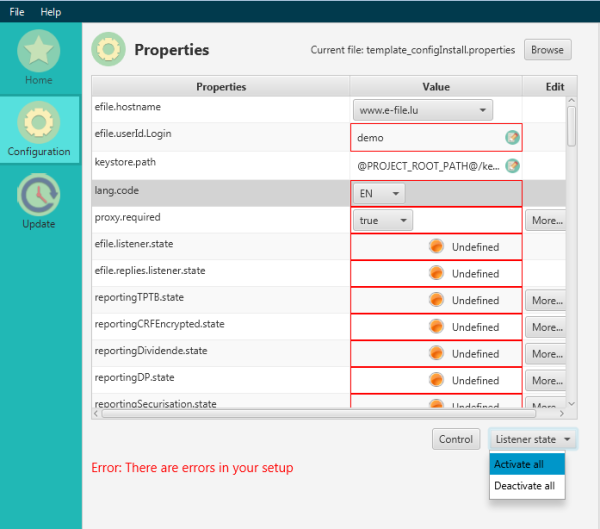
Configuration menu of the .properties file ( => Help: Configuration of the properties file):
The Configuration menu allows you to setup your Sending Service.
The message Error: There are errors in your setup indicates that nothing has been set-up so far.
You have to configure each field marked in red.
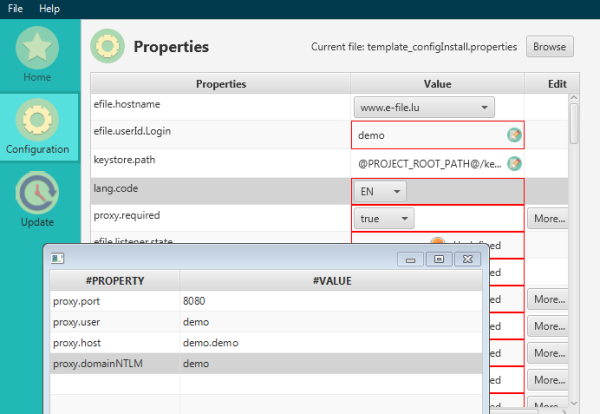
If you have a proxy, select True in the dropdown list and select More to type in the proxy settings.
Note: The passwords will be asked during the finalization of the installation, all passwords are encrypted.
Note 2: You can edit each field by clicking the More button
The listeners can be activated in one shot by clicking on the button Listener state : Activate all.
Note: This functionality will force the Sending Service to scan all the folders, if you do not want all listeners to be activated, please activate manually the listeners you need.
Please consult our Listener list.
You must complete the fields below, if you have to submit Investment Funds reporting O4.1; O4.2 (EDIFACT format).
domain.en.ac.cd_auth: this authentication code has been provided to you by the CSSF (postal mail).
domain.env.ac.id.bcl: this code is composed of a letter and six digits and has been provided to you by the CSSF (Example: P123, should be written as “P000123”).
domain.env.ac.id.cssf: this code is composed of a letter and six digits and has been provided to you by the CSSF (Example P123, should be written as “P000123”).
domain.env.ac.pwd: this authentication password has been provided to you by the CSSF (postal mail).
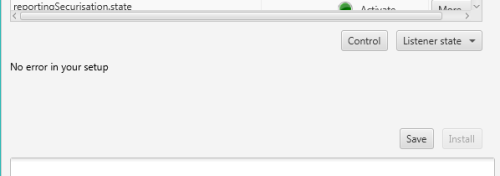
Once the configuration finished, you can click on Control to check if there is a configuration error.
The message No error in your setup means that the setup is correct.
If there are no errors, you can click on Save to save your actual configuration.
To install the Sending Service, you have to click on the Install button.
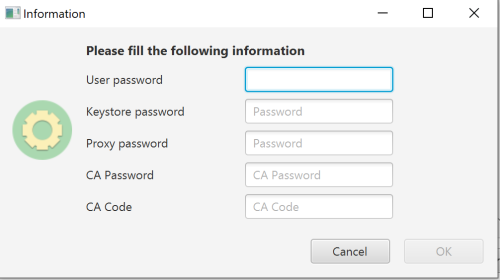
A pop-up window opens where you have to enter your passwords.
Note : If you do not use a proxy, you can leave a blank for the proxy password
Once finished a pop-up windows opens stating that the installation has been successful:
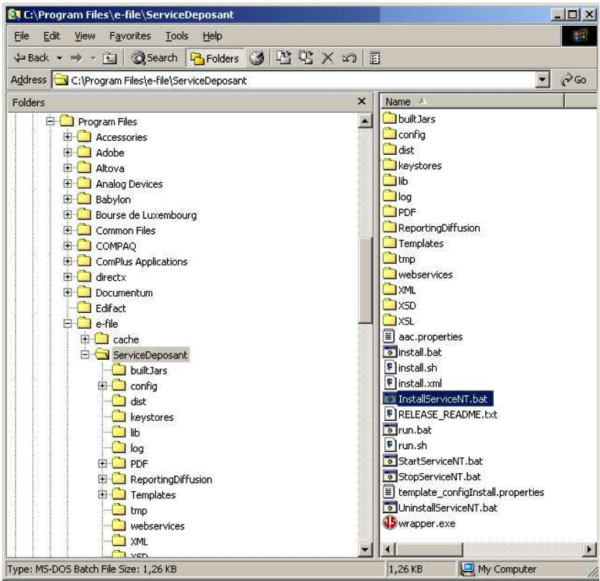
To start your Sending Service open the folder where you installed it and run the file run.bat or InstallServiceNT.bat if you want to install the Service as a Windows Service.
=> Installation as a Windows Service
=> How to start the Sending Service
=> How to stop the Sending Service
Update
IMPORTANT: before updating your Sending Service you have to stop the Sending Service.
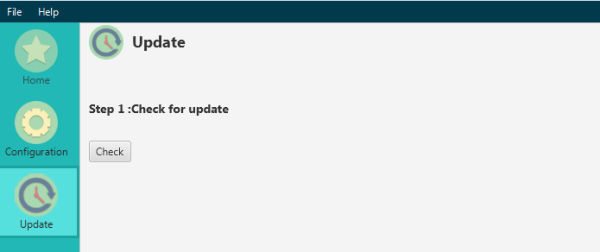
To update an existing Sending Service you have to click the Update button.
Then click on Check in order to verify if a new version is available.
If your Sending Service is up-to-date you will get the following message:
If there is a new version of the Sending Service available the following window will appear:
To continue the update, click on Ok.
During the first steps, the new version will be downloaded.
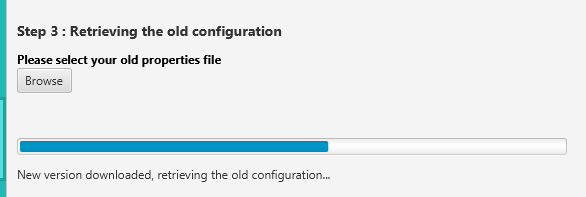
Once you have reached step 3, the tool will ask you to select your old configuration file (.properties file)
The tool will automatically back-up of your old Sending Service. You have to wait until the process is finished.
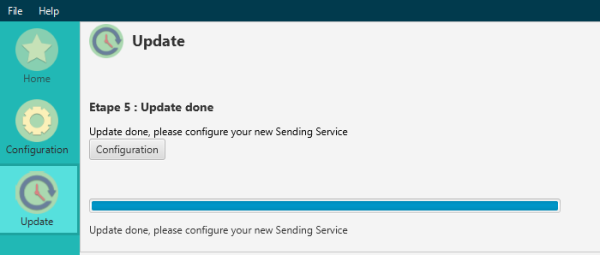
Step 5 will be the configuration of the updated Sending Service. You have to click on Configuration to access the Configuration menu.
If there are changes in the configuration file of the Sending Service with the new version, the fields will be marked in red. You will have to select the proper setup and save the changes.
Once the configuration finished, you can click on Control to check if there is a configuration error.
The message No error in your setup means that the setup is correct.
If there are no errors, you can click on Save to save your actual configuration.
To install the Sending Service, you have to click on the Install button.
A pop-up window opens where you have to enter your passwords.
Note : If you do not use a proxy, you can leave a blank for the proxy password
Send logs
If you encounter issues with your Sending Service, you can use the Help function to send an email to the Client Support & Operations Desk.
The tool will create automatically a zip file containing the log files of your Sending Service you can attach to the email.
Manual installation with Command Prompt
- Download the latest Sending Service version here: Download latest Sending Service version
- Extract and copy the entire content of the directory ServiceDeposant in the Sending Service directory. Ensure that the directory is not read only .
- Copy your keystore in the keystores folder of the Sending Service.
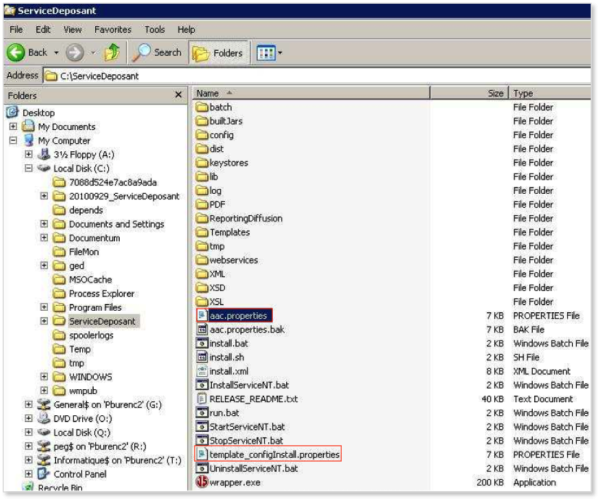
- Copy the template_configInstall.properties file and rename it [senderName].properties.
- Complete the properties file as explained in Configuration of the properties file chapter.
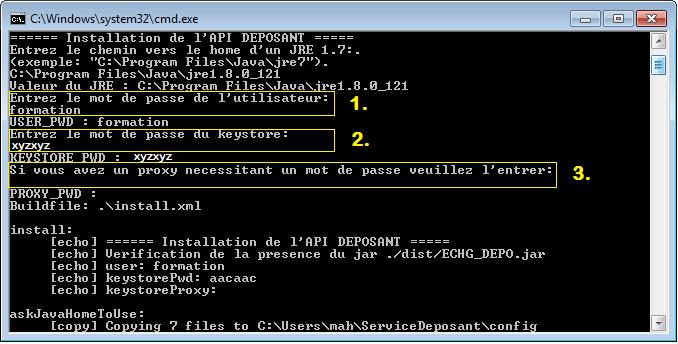
- Install the new Sending Service:
(-) Open Command Prompt
(-) Move to the root folder of your new Sending Service (for example: C:\Program Files\e-file\ServiceDeposant\)
(-) install.bat [senderName].properties
(-) enter the root path of your JRE (for example: C:\Program Files\Java\jre1.8)
(-) Enter the password of the e-file Sending Service user
(-) Enter the password of your keystore
(-) Enter the password of your proxy if you use a proxy
(-) Press the ENTER key
IMPORTANT:
NEW SECURITY ENHANCEMENTS as of 11th April 2017
The security settings of the Sending Service have been enhanced, and the different passwords previously written in clear text in the configuration file (‘.properties’) are now encrypted.
Please note that the installation procedure of the Sending Service slightly changed due to the implementation of this new feature:
At the end of the script you must get the following message: BUILD SUCCESSFUL indicating that the installation was successful.
IMPORTANT: each time you make changes to the properties (configuration) file, you have to stop the Sending Service before, make your changes and then install the Sending Service again.
=> Sending Service Installation Procedure.pdf
=> Sending Service Update Procedure.pdf
=> Service Déposant Procédure d’Installation.pdf
=> Procédure de Mise à Jour du Service Déposant.pdf
Configuration of the properties file
The .properties file (template_configInstall.properties) contains important information which are necessary to generate your configuration files during the physical installation.
The latter are used to start and use the Sending Service.
In other words :
- The .properties file contains all the variables needed to run the Service Service.
- Any modification of the .properties file must be followed by an installation of the Sending Service to be really taken into account.
Please find below important information on how to configure your .properties file.
Please note, that at the end of setup, no '?' should remain in this file.
E-file configuration
| Variable | Description |
|---|---|
| efile.hostname=???? | www.e-file.lu for production environment, or homologation.e-file.lu for test environment. |
| efile.userId.Login=???? | e-file login of the Sending Service user (Example: abcSD) |
| keystore.path=@PROJECT_ROOT_PATH@/keystores/????.ks | path of the keystore (xxxx.ks) |
| lang.code=FR??EN | language of the acknowledgement files |
Proxy configuration
| Variable | Description |
|---|---|
| proxy.required=false??true | true if a proxy is used to access the internet through HTTP or HTTPS. |
| proxy.host=???? proxy.port=???? proxy.user=???? proxy.domainNTLM=???? |
Complete all other parameters according your network infrastructure. |
Configuration of connection for authority acknowledgement / feedback files
| Variable | Description |
|---|---|
| reportingXXXXXX.state=up??down | All subsequent blocks in the .properties file corespond to a particular type of reporting.
Please consult our Listener list to verify which reporting type is linked to which listener. Example: if you only have to sent FATCA reportings, the state of the listener reportingFATCA.state has to be up: reportingFATCA.state=up The other listeners should be down. |
| reportingXXXXXX.remoteDir | Path to file location for the relevant reporting. |
| @PROJECT_ROOT_PATH@ | Dynamic parameter indicating the Sending Service installation path. To change if you want to locate the user working directory elsewhere on the server or another machine. In this case, indicate the full path to file (separator = '/'). |
| reportingXXXXXX.scheduleTime'' | Execution frequency of Window Service to process files from this folder (30mn by default).
Feel free to reduce this value, but do not fall below 5mn= 300000. |
| reportingXXXXXX.deeplevel'' | Number of sub-levels to scan. By default the value is 0, which means that only files at the root of the folder will be taken in account. |
Business environment properties
| Variable | Description |
|---|---|
| domain.descr | Not relevant. You can provide abbreviated name of the Central Administration. |
| domain.env.ac.id.cssf | Your CSSF identifier of 7 characters, 1 letter and 6 numbers |
| domain.env.ac.id.bcl | Your BCL identifier |
| domain.env.ac.pwd | Password of the Central Administration provided by the CSSF |
| domain.env.ac.cd_auth | Authentification code of the Central Administration provided by the CSSF.
The CSSF has provided you in an official letter your password and authentification code. The above mentioned IDs, passwords and codes are necessary for the successful processing of the O4.1, O4.2; O1.2 and the former O1.1 reporting. |
Configuration of monitoring
| Variable | Description |
|---|---|
| mon.app.heartbeat=false | If parameter is "true", we will be able to send you an alert if an interruption of your service is detected on our side (within 72 hours).
Should you want to use this feature feel free to contact us |
| mon.app.origin=???? | Unique name , without space, to enable us to identify your Sending Service. Not mandatory. |
| mon.task.dist.period=60000 | Frequency of the heartbeat (here 60000 milliseconds, 1 min). The monitoring window is set to 9 minutes. At least one heartbeat must have been registered during this interval otherwise the Sending Service is considered as down. |
Listener list
| Listener | Sending Service folder | Reporting type | Business group | Internal Technical Business ID |
|---|---|---|---|---|
| Please be informed that the listener efile.listener.state is no longer available in the properties file | - | - | - | - |
| Please be informed that the listener efile.replies.listener.state is no longer available in the properties file | - | - | - | - |
| NEW:reportingMMF=up | (-) ReportingDiffusion/MMF | CSSF - MMF | Money Market Fund Reporting | 83-Money Market Fund Reporting |
| reportingOPC.automatique.state=up | (-) ReportingDiffusion/OPC/envoi_Automatique/fichiersCCLUX (-) ReportingDiffusion/OPC/envoi_Automatique/fichiersCCLUX/Enrichment (-) ReportingDiffusion/OPC/envoi_Automatique/TPT_FINESTI |
CSSF - Investment Funds: O4.1, O4.2, O1.2, U1.1 BCL : S1.3, S1.6, S2.13, TPTOBS |
Station Finesti | 8-Transmission of UCI regulatory reports |
| reportingOPCExportXLS.automatique.state=up | ReportingDiffusion/OPC/envoi_Automatique/ExportXLS | CSSF - Investment Funds: O4.1, O4.2, O1.2, U1.1 BCL : S1.3, S1.6, S2.13, TPTOBS |
Station Finesti | 8-Transmission of UCI regulatory reports |
| reportingOPC.envoi_Historique.state=up | ReportingDiffusion/OPC/envoi_Historique/fichiersCCLUX | CSSF - Investment Funds: O4.1, O4.2, O1.2, U1.1 BCL: S1.3, S1.6, S2.13, TPTOBS |
Station Finesti | 8-Transmission of UCI regulatory reports |
| reportingOPC.semiAuto.state=up | n/a | n/a | n/a | n/a |
| reportingVni.state=up | ReportingDiffusion/VNI | tbd | tbd | tbd |
| reportingDividende.state=up | ReportingDiffusion/Dividendes | tbd | tbd | tbd |
| reportingTAF.state=up | (-) ReportingDiffusion/TAF (-) OBSOLETE: ReportingDiffusion/TAF/declaration_Transaction |
CSSF: transactions in financial instruments (TAF) | Report TAF-MIFID | 71-MiFIR reporting |
| reportingTAF.state=up | (-) ReportingDiffusion/TAF (-) OBSOLETE: ReportingDiffusion/TAF/declaration_Transaction |
CSSF: transactions in financial instruments (TAF) | Report TAF-MIFID | 71-MiFIR reporting |
| reportingIORP.state=up | ReportingDiffusion/IORP | CSSF - Annual and quarterly reporting according to Circular CSSF 19/726 of 26 July 2019 | Report IORP | 80 |
| reportingCOREP.state=up | ReportingDiffusion/COREP | CSSF: SCOREP; SLAREX; SLCRXX; SNSFRX; SALMXX; CCOREP; CLAREX; LCRXX; CNSFRX; CALMXX; CFINRP; SFINRP; AEXXX; SAEXXX; CFPXXX; SFPXXX; CSBPXX; SSBPXX; CSBPIM; SSBPIM; CLCRDA; SLCRDA |
Rapport COREP | 72-COREP reporting |
| reportingFINREP.state=up | ReportingDiffusion/FINREP | CSSF: B2.4; B2.5 | Rapport FINREP | 73-FINREP reporting |
| reportingFINREP.EDIFACT.state=up | ReportingDiffusion/FINREP/EDIFACT_CSSF | CSSF: B4.4 | Reporting EDIFACT | 16-Edifact |
| reportingBOP.state=up | ReportingDiffusion/BOP | BCL - Credit institutions: Balance of payments (BOP1.1; BOP1.2) | Balance des Paiements | 12-Edifact reporting |
| reportingBCLStat.state=up | ReportingDiffusion/BCL_Statistics | BCL - Credit institutions: S0.1; S1.1; S1.4; S1.5; S1.8; S1.9;S1.12 S2.5-L; S2.5-N; S2.8; S2.9-L; S2.9-N; S3.2 |
Statistiques BCL | 13-BCL statistics |
| reportingAnacredit.state=up | ReportingDiffusion/Anacredit | ANTREF; ANTT1M; ANTT2M; ANTT2Q | Rapport Anacredit | 74 ANACREDIT reporting |
| reportingSecurisation.state=up | ReportingDiffusion/Securisation | BCL - Securitation vehicles: S2.14; S2.15; TPTTBS | Véhicule titrisation | 23-Véhicule titrisation |
| reportingSecurisationS2.14ExportXLS.state=up reportingSecurisationS2.15ExportXLS.state=up reportingSecurisationTPTTBSExportXLS.state=up |
ReportingDiffusion/Securisation/ExportXLS | BCL - Securitation vehicles:S2.14; S2.15; TPTTBS | Véhicule titrisation | 23-Securitisation vehicule |
| reportingTPTB.state=up | ReportingDiffusion/TPT | BCL - Credit institutions: TPTBBL; TPTBBN; TPTBHR; TPTBHN | Titre par Titre Bancaire | 20-Security by security reporting |
| reportingTPTBExportXLS.state=up | ReportingDiffusion/TPT/ExportXLS | BCL - Credit institutions: TPTBBL; TPTBBN; TPTBHR; TPTBHN | Titre par Titre Bancaire | 20-Security by security reporting |
| reportingESP.state=up | ReportingDiffusion/ESP | CSSF: Special Enquiries (ESPREP) | Rapport Enquête | 15-CSSF polls |
| reportingPSF.state=up | ReportingDiffusion/PSF | CSSF - Professional of the financial sector (PSFREP) | Rapport PSF | 18-PSF reporting |
| reportingSICAR.state=up | ReportingDiffusion/SICAR | CSSF - SICAR | Rapport SICAR | 17-SICAR reporting |
| reportingOTH.state=up | ReportingDiffusion/OTH | CSSF - Other reporting (OTHREP) | Reporting OTHER (CSSF) | 19-OTHER reporting (CSSF) |
| reportingRFOPC.state=up | ReportingDiffusion/DOC_FIS_OPC/REPORT_OPC | CSSF UCI: (-) Annual Report (AR) (-) Semi-annual report (SR) (-) Letter of explanation (LE) (-) Other periodic report(RO) (-) Movements in the securities portfolios (MP) |
Doc OPC et FIS (circ. CSSF) | 21-Métier des circulaires CSSF 08/371 et 09/423
|
| reportingRAFIS.state=up | ReportingDiffusion/DOC_FIS_OPC/REPORT_FIS | CSSF SIF: (-) Annual Report (AR) |
Doc OPC et FIS (circ. CSSF) | 21-Métier des circulaires CSSF 08/371 et 09/423 |
| reportingPOPC.state=up | ReportingDiffusion/DOC_FIS_OPC/PROSP_OPC | CSSF UCI: (-) Prospectus (PC) (-) Simplified prospectus (PS) (-) Letter of explanation (LE) |
Doc OPC et FIS (circ. CSSF) | 21-Métier des circulaires CSSF 08/371 et 09/423 |
| reportingPFIS.state=up | ReportingDiffusion/DOC_FIS_OPC/PROSP_FIS | CSSF SIF: (-) Prospectus (PC) (-) Offering document (DE) (-) Letter of explanation (LE) |
Doc OPC et FIS (circ. CSSF) | 21-Métier des circulaires CSSF 08/371 et 09/423 |
| reportingKID.state=up | ReportingDiffusion/DOC_FIS_OPC/KID_OPC | Key Investor Information Document (KIID) (-) O: OPC Law 2010 and Law 2007 |
Doc OPC et FIS (circ. CSSF) | 21-Métier des circulaires CSSF 08/371 et 09/423 |
| reportingMR.state=up | ReportingDiffusion/DOC_FIS_OPC/MGMT_REGUL | CSSF - Management Regulations of UCITS (MR) | Doc OPC et FIS (circ. CSSF) | 21-Métier des circulaires CSSF 08/371 et 09/423 |
| reportingAI.state=up | ReportingDiffusion/DOC_FIS_OPC/ART_INCORP | CSSF - Articles of Incorporation of UCITS (AI) | Doc OPC et FIS (circ. CSSF) | 21-Métier des circulaires CSSF 08/371 et 09/423 |
| reportingML.state=up | ReportingDiffusion/DOC_FIS_OPC/MGMT_LETTER | CSSF - Management Letters (ML) (-) O: OPC Law 2010 and Law 2007 |
Doc OPC et FIS (circ. CSSF) | 21-Métier des circulaires CSSF 08/371 et 09/423 |
| reportingLF.state=up | ReportingDiffusion/DOC_FIS_OPC/LONG_FORM | CSSF - Long Form reports (LF)
(-) O: OPC Law 2010 |
Doc OPC et FIS (circ. CSSF) | 21-Métier des circulaires CSSF 08/371 et 09/423 |
| reportingMLGFI.state=up | ReportingDiffusion/DOC_FIS_OPC/MGMT_GFI | CSSF CSSF-Management Letter of Investment Fund Managers (IFM EN) |
Doc OPC et FIS (circ. CSSF) | 21-Métier des circulaires CSSF 08/371 et 09/423 |
| NEW: reportingRGFI.state=up | ReportingDiffusion/DOC_FIS_OPC/REPORT_GFI | CSSF Annual management company report |
Doc OPC et FIS (circ. CSSF) | 21-Métier des circulaires CSSF 08/371 et 09/423 |
| NEW: reportingDOC_OTH.state=up | ReportingDiffusion/DOC_FIS_OPC/OTHER | CSSF Auditor's report (RR) |
Doc OPC et FIS (circ. CSSF) | 21-Métier des circulaires CSSF 08/371 et 09/423 |
| NEW: reportingCSDR.state=up | ReportingDiffusion/CSDR | CSSF Report CSDR |
Reporting CSDR-9 | 78-Reporting CSDR |
| reportingGFI.state=up | ReportingDiffusion/DOC_FIS_OPC/DOC_GFI | CSSF CSSF-Management Letter of Investment Fund Managers (IFM EN) (-) Risk management function(GR)
|
Doc OPC et FIS (circ. CSSF) | 21-Métier des circulaires CSSF 08/371 et 09/423 |
| reportingAML-AIFM-REG.state=up | ReportingDiffusion/DOC_FIS_OPC/AML_AIFM_REG | CSSF CSSF-Management Letter of Investment Fund Managers (IFM EN)
|
Doc OPC et FIS (circ. CSSF) | 21-Métier des circulaires CSSF 08/371 et 09/423 |
| reportingCD.state=up | ReportingDiffusion/Various_Correspondence | BCL - Other reporting (OTX) | Reporting OTHER (BCL) | 22-Various correspondence (OTH=> BCL) |
| reportingSGO.state=up | ReportingDiffusion/SGO | CSSF - Management company reporting (SGOREP) | Rapport Société de Gestion | 26-Management company |
| reportingDOCBNK.state=up | ReportingDiffusion/DOC_BNK | AR: Annual Report NEW: AS: Annual report consolidated |
Reporting des établissements de crédit | 27-Reporting of credit institutions |
| reportingEDP.state=up | ReportingDiffusion/EDP | CSSF - Payment instituions (EDPREP): Z1.1; Z1.2; Z1.4; Z2.1 | Reporting EDP | 29-Periodic reporting scheme for payment instituions (EDP) |
| reportingEME.state=up | ReportingDiffusion/EME | CSSF - Electronic money instituions (EMEREP): W1.1; W1.2; W1.3; W1.4; W2.1 | Reporting EDP | 34-Electronic money reporting (EME) |
| reportingPubDiffu.state=up | ReportingDiffusion/DOC_FIS_OPC/PUB_FINESTI ReportingDiffusion/DOC_OPC_NOT_LU/PUB_FINESTI |
tbd | tbd | 32-Envoi pour publication/diffusion 33-Envoi pour publication/diffusion OPC non LU |
| reportingOPCNONLU.state=up | ReportingDiffusion/DOC_OPC_NOT_LU/LOCAL_REGISTRATION ReportingDiffusion/DOC_OPC_NOT_LU/LOCAL_NOTIFICATION |
HOST_UPDATE: Automated process for KIID packages | tbd | 30-Enregistrement pour OPC non LU 31-Notification pour OPC non LU |
| reportingMAJDOCLU.state=up | ReportingDiffusion/DOC_FIS_OPC/HOST_UPDATE | tbd | tbd | 37-Enregistrement/Mise à jour de documents Fond LU vers pays HOST |
| reportingSE.state=up | ReportingDiffusion/SE | BCL - Financial companies: S2.16; S2.17; TPTIBS | Reporting des sociétés émettrices | 35-Issuing companies reporting |
| reportingSEExportXLS.state=up | ReportingDiffusion/SE/ExportXLS | BCL - Financial companies: S2.16; S2.17; TPTIBS | Reporting des sociétés émettrices | 35-Issuing companies reporting |
| reportingSETransfoXLS.state=up | ReportingDiffusion/SE | BCL - Financial companies: S2.16; S2.17; TPTIBS | Reporting des sociétés émettrices | 35-Issuing companies reporting |
| reportingASS.state=up | ReportingDiffusion/ASS | BCL - Insurance companies: S0218-L; S0219-L; S0403-L; TPTASS | Reporting BCL pour les assurances | 63-Reporting BCL pour les assurances |
| reportingASSExportXLS.state=up | ReportingDiffusion/ASS/ExportXLS | BCL - Insurance companies: S0218-L; S0219-L; S0403-L; TPTASS | Reporting BCL pour les assurances | 63-BCL report for insurances |
| reportingASSTransfoXLS.state=up | ReportingDiffusion/ASS | BCL - Insurance companies: S0218-L; S0219-L; S0403-L; TPTASS | Reporting BCL pour les assurances | 63-BCL report for insurances |
| reportingDP.state=up | ReportingDiffusion/CDP | BCL - Data on payment operation: V 1.1 - V 1.14 | Collecte des données de paiement (CDP) | 36-Data on payment instruments and operations |
| reportingNotifUcitsIV.state=up | ReportingDiffusion/DOC_FIS_OPC/NOTIFICATIONS_UCITSIV | tbd | tbd | 28-UCITS IV notification |
| reportingFINESTI.state=up reportingLIBFINLU.state=up |
ReportingDiffusion/DOC_FIS_OPC/LIBRARY_FINESTI | tbd | tbd | tbd |
| reportingLIBFINNOTLU.state=up | ReportingDiffusion/DOC_OPC_NOT_LU/LIBRARY_FINESTI | tbd | tbd | tbd |
| OBSOLETE : reportingCRF.state=up | n/a | n/a | n/a | n/a |
| OBSOLETE : reportingCRFEncrypted.state=up | n/a | n/a | n/a | n/a |
| reportingAIF.state=up | ReportingDiffusion/AIF | CSSF - Alternative Investment Fund managers: AIF / AIFM | (-) AIF (-) AMfine |
54-AIFMD reporting |
| reportingFATCA.state=up | ReportingDiffusion/FATCA | ACD - Financial Institutions - Foreign Account Tax Compliance Act (FATCA) | Rapport FATCA | 60-FATCA reporting |
| reportingCAA.state=up | ReportingDiffusion/CAA | (-) CAA - Rapports narratifs (N01-N10 (-) CAA - XBRL reports Solvency II (S01-S23) |
||
| reportingCRS.state=up | ReportingDiffusion/CRS | ACD - Financial Institutions - Common Reporting Standard (CRS) | Reporting CRS | 68-CRS reporting |
Installation as a Windows Service
Once the installation the Sending Service is completed, the InstallServiceNT.bat file is available and you can complete your Sending Service installation by creating the Windows Service ServiceDeposant.
Execution frequency of Window Service ServiceDeposant to process files from this folder is 30mn by default => Configuration of the properties file.
Double click the InstallServiceNT.bat file.
A Command Prompt window opens up and closes as quickly as it popped up. The new Windows Service ServiceDeposant is now available.
=> How to start the Sending Service
=> How to stop the Sending Service
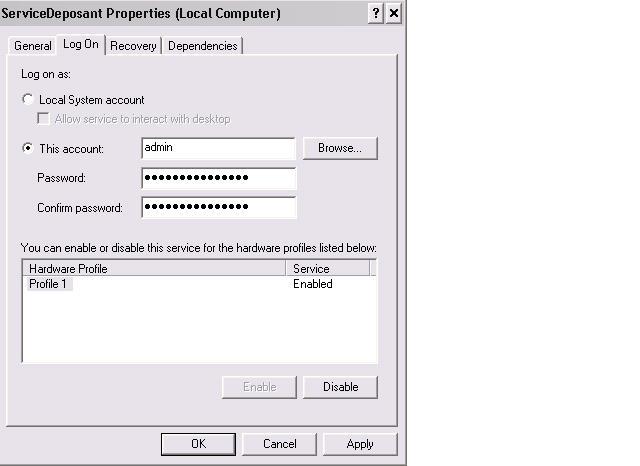
IMPORTANT: Please ensure the Sending Service user that is linked to this Windows Service has Internet rights (=> Right click on Service deposant > select Properties > select Log On tab).
If you want to uninstall the Windows Service, please double click the UninstallServiceNT.bat file.
Installation on Unix/Linux
- Move to the ServiceDeposant directory
Example : /opt/ServiceDeposant/
- Check that you have execution rights (x) on the Install.sh file
Example : ls -l
- If not, just add this right using the chmod command
Example : chmod 755 install.sh
- Launch Install.sh with the configuration file as parameter
Example : install.sh config.properties
- Press the Enter key and enter the Java path when requested
- Press the Enter key again and wait for the ‘BUILD SUCCESSFUL’ message.
How to start the Sending Service
- Double click the run.bat command available at the root folder of your Sending Service
In the case you created a Windows Service
- Double click the StartService NT.bat command available at the root folder of your Sending Service
or
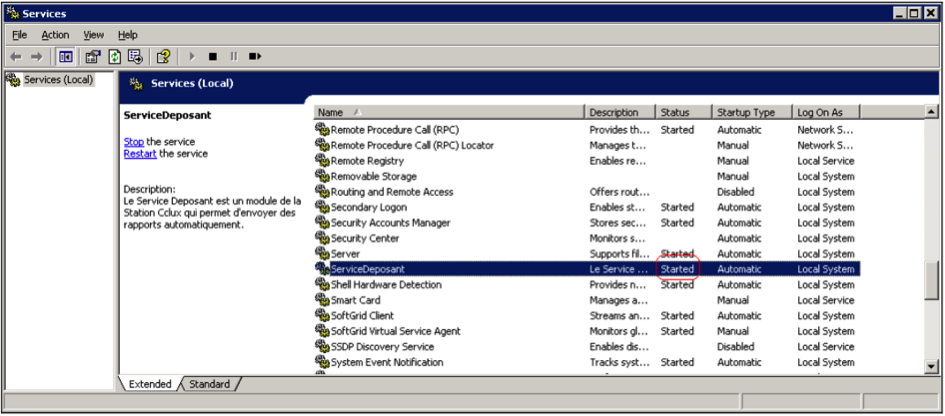
- Browse to the Windows Services console (Start > Control Panel > Administrative Tools > Services) and right click the ServiceDeposant service and start the service.
The message *Fin Ok* means that the installation was successful.
How to stop the Sending Service
- If you launched the Sending Service using the run.bat command, you can stop it pressing the keys Ctrl+C+Y.
In the case you created a Windows Service
- Double click the StopService NT.bat command available at the root folder of your Sending Service
or
- Browse to the Windows Services console (Start > Control Panel > Administrative Tools > Services) and right click the ServiceDeposant service and stop the service.
Automatic and semi-automatic sending of O4.1 and O4.2 reports
For O4.1 and O4.2 reports the CSSF is expecting EDIFACT file format (ISO 9735).
Please note that you have to generate yourself a flat text file for these reports, which, once dropped into the dedicated directory of the Sending Service, will be transformed into the expected EDIFACT format.
The structure of the flat file is detailed in the document Structure of messages for interface files from fund manager host system, pages 8 to 14.
The Sending Service provides two sending possiblities:
Automatic sending
In this case, the flat files must be dropped into the OPC\envoi_Automatique\fichiersCCLUX folder of your Sending Service.
If the flat file is well formed, the reports are directly sent to the authorities.
In case of an error, an error file (text file with .err extension) is generated.
Semi-automatic sending
If you want to use this kind of sending, you have to drop your flat file into the OPC\envoi_SemiAutomatique\fichiersCCLUX_aTraiter folder of your Sending Service, where it will be converted to a PDF file and stored in the OPC\envoi_SemiAutomatique\fichiersPDF_aValider folder.
The PDF file allows you to check the data of your flat file in a more user friendly way before you transmit it to the supervisory authority.
Once checked/validated, the PDF file must be dragged into OPC\envoi_SemiAutomatique\fichiersPDF_aEnvoyer folder.
After being checked for errors, the file is transmitted to the supervisory authority.
Automating process for KIID packages
In the context of KIID updates to be filed to the CSSF, it is possible to set up the automatic sending of KIIDs packages (.zip files) from our server to your Sending Service. Once the Sending Service has received the KIIDs, they are copied in one of the following directory:
Luxembourgish fund
\ReportingDiffusion\DOC_FIS_OPC\KID_OPC
Foreign fund
\ReportingDiffusion\DOC_OPC_NOT_LU\HOST_UPDATE
Then the files are sent to the CSSF in the usual way.
If you want to use this feature, please
- Install the Sending Service => Installation with Sending Service Installer or => Manual installation with Command Prompt
- Ensure that the listeners reportingOPCNONLU.state and reportingKID.state in your properties file are =up
- Contact our Regulatory Service department and request the installation of this specific feature.
- Generate the KIID package (.zip file) in the UCITS IV Document Management application (https://www.e-file.lu). Please note that in some cases an automated process on our servers can be installed.
Do not hesitate to contact our Client Support & Operations Desk if you need further assistance.
Sending progress and follow up
Transmission following
Here are the default transmission followup files that are created depending on the state in the transmission workflow.
| File extension | Description |
|---|---|
| .trt | Example : file processing of FileName.ext
Once the file has been dropped into the appropriate folder, the Sending Service will start processing it and rename it as follows: FileName.ext_YYYYMMDDhhmmssmmm.trt |
| .acq | Once the processing finished an .acq file will be generated in the same folder by the Sending Service in order to confirm the transmission:
FileName.ext_YYYYMMDDhhmmssmmm.acq |
| .err | An .err file is created in case or an error:
FileName.ext_YYYYMMDDhhmmssmmm.err Please open this file and analyse the error message. |
| .ack | In the case of CSSF reports O4.1; O4.2; former O1.1 a technical file .ack is sent by the authorities confirming that the receipt of the file:
FileName.ext_YYYYMMDDhhmmssmmm.ack This file completes the .acq file which only confirms the successful transmission. |
Feedback files (Replies folder)
For some reporting, the administration will give you more detailed feedback. In this case, those feedback will replace the corresponding ones in the previous section.
By default, feedback files are dropped into Replies sub-folders. Replies folders are created dynamically in the initial transmission folder of the files. They only appear when feedback files, sent by the supervisory authorities, have to be stored. If the folder is deleted, it will be automatically recreated upon receipt of new feedback files.
The name and location of the Replies folder may be configured differently from the implementation of the solution with your company’s project coordinator => Configuration .properties file.
| Autority | Description |
|---|---|
| CSSF | Feedback files generated and sent by the CSSF.
Please click the picture below to access the Naming convention for CSSF reportings document: |
| BCL | Feedback files generated and sent by the BCL.
The BCL sends feedback with the following naming convention : FDBTECH_[OK/KO]_[YYYYMMDD]_[SENT FILE NAME]_[RANDOM CARACTERS].xml With
|
- For other reporting (08/371 / VNI...), there is no additionnal acknowledgment.
This means that only acq will be created.
Conclusion : Checking that both trt and acq files were generated is a good way to ensure the good working of the Sending Service. Doing this way, you can be sure that your data was correctly sent and e-file will be in charge of forwarding them to authoritites.
Sending Service versions and updates
Please be informed that our system is able to check the version of the program you are running. This information is sent to our database when the service is launched.
Please note that the RELEASE_README.txt file, located at the root folder provides you information on the different Sending Service versions.
The example below indicates that the Sending Service version 4.5.6 is being used:

In case of major Sending Service changes, our Client Support & Operations Desk will notify you by sending an INFO-email to your local e-file administrator.
Functional testing and test environment
In fact, it is not necessary to test the working of the Sending Service by performing a test sending.
Indeed, all technical checks are performed during the startup process.
In other words, if the startup process does not generate any error message, then the Sending Service is running properly.
- Launch the Sending Service through the dos run.bat file or through the Windows Service.
- Check the log files generated in the log folder of Service Deposant.
- The Sending Service is running properly if the error.log file is empty or if it does not contain any line in relation to the starting process.
Remark : If a problem occurs after this check, it would certainly be a functional problem or could also be linked to the e-file configuration.
In this case, we recommand to check the .err file automatically generated during the sending process.
If you want to install a test environment in order to validate the your source files or to anticipate a migration procedure, please follow the steps below:
- Duplicate the production Sending Service by copying the whole Service Deposant folder to another location.
- Adjust the properties file to redirect the service to our test environment : Homologation. e-file.hostname = homologation.e-file.lu
Please note that, if the user login may remain the same, the password will be changed to formation for our test environment.
Do not forget to modify the path to your test files if these ones are stored in a specific location.
Finally, to identify cleary both Windows services, you must adjust the parameters used to identify the Windows Service name : wrapper.app.long.name and wrapper.app.name
- Relaunch the Sending Service installation
Common Problems
The service does not start
Please refer to following procedure if a Sending Service, launched through the Windows Services does not start in order to analyze the origin of the problem.
Attempt to start it with the DOS command line
- Open a DOS window and make sure to have administrator rights on the computer (Start>run : cmd)
- Move to the folder where the sending service is installed
- Run the command : run.bat
If the sending service runs properly through this DOS command, without generating error logs, we recommand to follow this solving method.
Otherwise, a log analysis is necessary
Log Analysis
The error.log file located in the log folder at the root of Sending Service, contains the error trace causing this dysfunction.
You will find below the most common known problems.
In all cases, we are at your disposal to assist you in this analysis. Feel free to contact our Client Support & Operations Desk.
Network Problem
Error 1 : Error when webservice's call 'obtenirVersionsDocument'.Unrecognized SSL message, plaintext connection.
Solving Method
- Check the proxy parameters of your properties file
- Relaunch the sending service installation process so that the changes are taken into account.
Error 2 : java.net.ConnectException: Connection timed out: connect.
Error 3 : Connection timed out: connect [TIP: The machine can be unauthorized by the proxy]
Solving Method
- Check the configuration of your proxy with your network team.
It must be correctly configured to allow outbound connections to our server www.e-file.lu HTTP and HTTPS.
Other time out problem
Error : Startup failed: Timed out waiting for signal from JVM.
Solving Method
- Increase the value of wrapper.startup.timeout parameter from your properties file.
As an example, increase from 300 to 600. - Relaunch the sending service installation to take the changes in account.
This parameters indicates the duration allocated to the service startup. Is some cases, 5 mn may not be enough, particularly with slow proxy connectionsto e-file.
Administrator rights issue with Windows service
By default, a windows service runs through a non administrator system user.
Depending on your architecture, it is possible that this user account has not enough rights to ensure a proper start of the Sending Service. (proxy issue for example)
Then simply change this setting this way:
Solving Method
- Open the Windows services window. (Start > Control Panel > Administrative tools > Services)
- Right click on the service named ServiceDéposant
- Select the Properties item
- Indicate an administrator user account and password in LogOn tag.
- Relaunch the service
Errors are raised during sending
The generation of an .err file during the processing of your report indicates an issue during the sending.
In this case, it is necessary to analyze the problem because the data could not be transmitted to the authorities.
The .err file contains the explanation of the error that generates this dysfunction.
You will find below the most common problems.
In all cases, we are at your disposal to assist you in this analysis. Feel free to contact Client Support & Operations Desk.
Functional Problem
Error 1 : Failed to validate XML
Error 2 : All error indicating a data problem
Solving Method
- Correct the source file according to the erro messages indicated in the .err file.
- Resend the file.
User account problem
Error 1 : Getting addressees information Une erreur est survenue lors de l'execution du Workflow
Solving Method
- Link the sending service user account to the right User Group according to the kind of reporting your are trying to send.que vous cherchez à envoyer. His profils should be SD with response
Certificate Update
Once your Luxtrust certificate is activate in E-file, you need to replace de new keystore in the sending service. Please find below what you need to do:
- Stop your sending service
- Copy your new keystore in the keystores folder of the Sending Service.
- Update the configuration: It is possible that your new Keystore has a different name than the previous Keystore therefore it is necessary to update the configuration.
E-file configuration
| Variable | Description |
|---|---|
| keystore.path=@PROJECT_ROOT_PATH@/keystores/????.ks | path of the keystore (xxxx.ks) |
- Install the sending service: To install the Sending Service, you have to click on the Install button. A pop-up window opens where you have to enter your passwords.
Note : If you do not use a proxy, you can leave a blank for the proxy password
Once finished a pop-up windows opens stating that the installation has been successful:
To start your Sending Service open the folder where you installed it and run the file run.bat or InstallServiceNT.bat if you want to install the Service as a Windows Service.
=> Installation as a Windows Service
