Difference between revisions of "MIFID2"
| Line 133: | Line 133: | ||
= Sending Service management = | = Sending Service management = | ||
Select '''Users''' tab of the '''Administration module''' and press the '''Sending Service Management''' button. The '''Sending Service List''' opens. | Select the '''Users''' tab of the '''Administration module''' and press the '''Sending Service Management''' button. The '''Sending Service List''' opens. | ||
[[File:SDAdmin.png|700px]] | [[File:SDAdmin.png|700px]] | ||
<u>Explanations</u>: | |||
1. '''Status''': the green check mark indicates that the [[Sending Service|'''Sending Service''']] is active. | 1. '''Status''': the green check mark indicates that the [[Sending Service|'''Sending Service''']] is active. | ||
| Line 155: | Line 157: | ||
If you want to display in the '''Sending Service List''' only the Sending Services to which the '''Group FATCA''' is assigned, you have to select '''FATCA''' in the drop down list and press the '''SEARCH''' button. | If you want to display in the '''Sending Service List''' only the Sending Services to which the '''Group FATCA''' is assigned, you have to select '''FATCA''' in the drop down list and press the '''SEARCH''' button. | ||
8. Click the '''Edit groups''' [[File:EditGroupSD.png|20px]] icon to get more detailed information on the [Sending Service|'''Sending Service''']] user. | 8. Click the '''Edit groups''' [[File:EditGroupSD.png|20px]] icon to get more detailed information on the [[Sending Service|'''Sending Service''']] user. | ||
| Line 167: | Line 169: | ||
If you want to submit COREP reportings through the [[Sending Service|'''Sending Service''']], you have to assign the group COREP to your Sending Service. | If you want to submit COREP reportings through the [[Sending Service|'''Sending Service''']], you have to assign the group COREP to your Sending Service. | ||
Select '''Users''' tab of the '''Administration module''' and press the '''Sending Service Management''' button. The '''Sending Service List''' opens | Please follow the steps below: | ||
1. Select the '''Users''' tab of the '''Administration module''' and press the '''Sending Service Management''' button. The '''Sending Service List''' opens. | |||
2.Click the '''Edit groups''' icon [[File:EditGroupSD.png|20px]] of the [[Sending Service|'''Sending Service''']] to which you want to add the COREP group. | |||
[[File:SDMmgt.png|700px]] | |||
The '''Change groups of Sending Service''' page opens. | The '''Change groups of Sending Service''' page opens. | ||
| Line 175: | Line 181: | ||
[[File:ChangeGroupSD.png|700px]] | [[File:ChangeGroupSD.png|700px]] | ||
<u>Explanations</u>: | |||
All '''Groups''' assigned to the [[Sending Service|'''Sending Service''']] are listed here '''(1)'''. | |||
The only possible '''Profile''' value is "Sending Service" '''(2)'''. | |||
If the '''Alerts'''checkbox is checked [[File:Tick.png|20px]] '''(3)''', it means that the [[Sending Service|'''Sending Service''']] will receive '''replies''' (= feedbacks) from the regulator. These '''replies''' will be dropped automatically into the [[Sending_Service#Sending_progress_and_follow_up|'''replies''']] respective Sending Service folder. | |||
4. Press the '''EDIT''' button. The '''Details''' page of your Sending Service to which you want the COREP reporting opens. | |||
[[File:AddGroup.png|100px]] | |||
Revision as of 15:31, 7 October 2018
Create a new e-file user
Step 1:
Connect to e-file.lu with your e-file administrator login (adminXXX) and click the Administration module icon.
Step 2:
Click the Users button
Step 3:
The Users list screen opens. Click the Create a user button
Step 4:
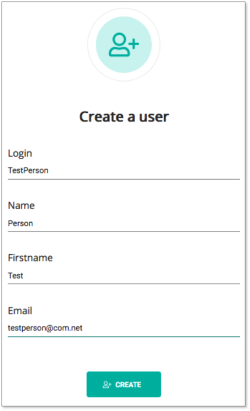
The Create a user window pops up. Complete the form as shown in the figure below and click the Create button.
Step : 5
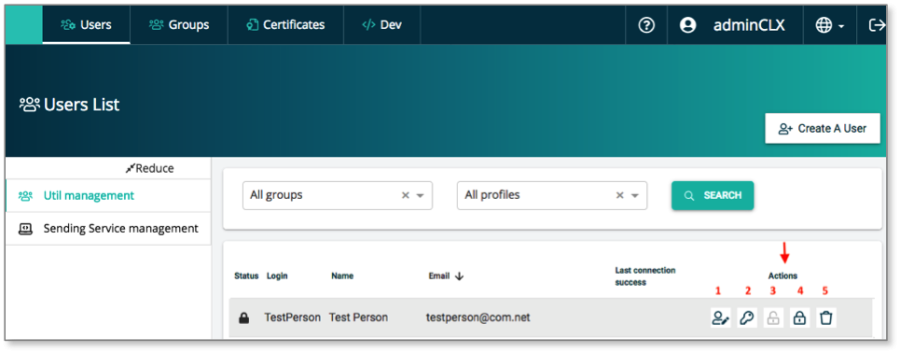
Go back to the Users list screen. Move the mouse over the user you just created. Five icons will appear allowing to perform the following actions:
Action 1: Edit user settings
Action 2: Force password change. If you press this icon, an email is sent to the user with a web-link to reset his password.
Action 3: The user is locked. Please be informed, that a new user will automatically be unlocked when he logs in for the first time.
Action 4: Lock the user.
Action 5: Delete the user.
Sort functions in the Users List
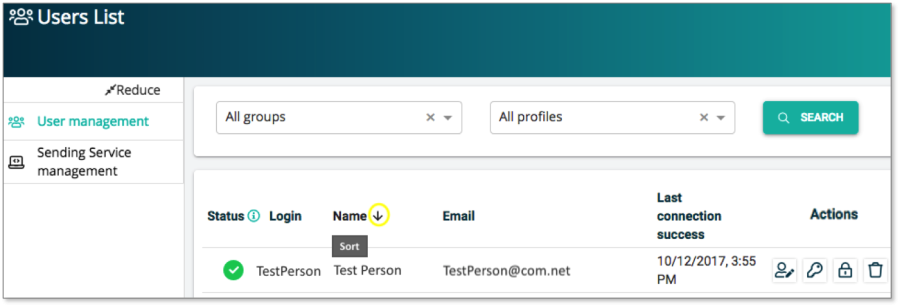
The Login, Name, Email and Last connection columns can be sorted (A to Z or smallest number to largest).
Example:
If you want to sort the Name column from A to Z or Z to A, click directly on Name on the top of the column. The direction of the arrow shows whether the sort is ascending or descending.
Filter functions in the Users List
Example:
If you want to display in the Users List only the users to whom the Group FATCA and the profile Manager have been assigned, you have to select the filter criteria as shown in the figure below and press the SEARCH button.
Assign groups and profiles to users
Step : 1
Open the Users list screen (see screen above) and click the Edit icon of the user to whom you want assign groups and a specific profile.
Step : 2
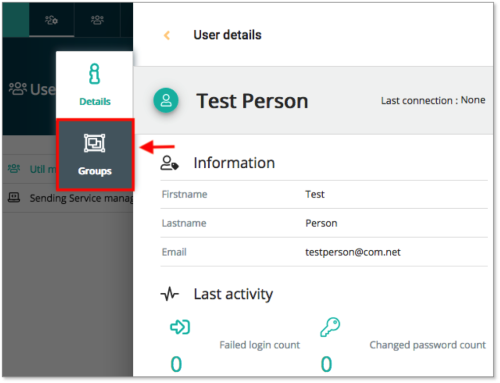
The User details screen opens. Click the Groups icon.
Step : 3
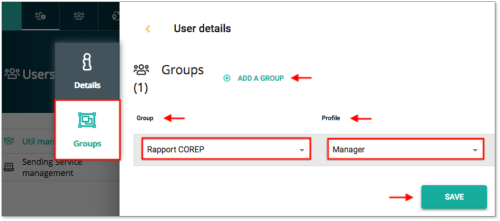
The User details / Groups screen opens.
Select the groups and profile you want to assign and click the ADD A GROUP button. Once you have added the groups and selected the profile, click the Save button.
Please be informed that you can find detailed information on all groups on our Wikipage Product Coverage; column e-file user account: "groupe".
Example:
If a user has to send COREP reportings to the CSSF, the e-file administrator must assign the group Rapport COREP and the profile Manager to the user.
Sending Service management
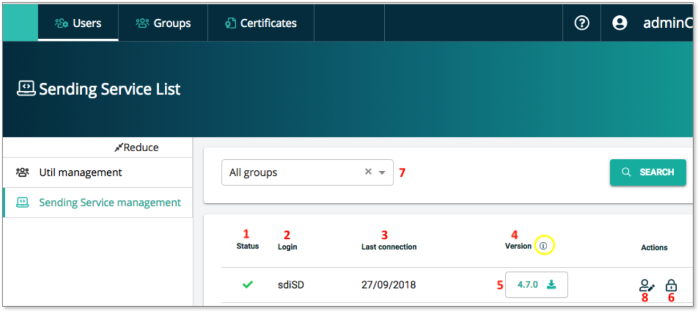
Select the Users tab of the Administration module and press the Sending Service Management button. The Sending Service List opens.
Explanations:
1. Status: the green check mark indicates that the Sending Service is active.
2. Login: it is the login of the Sending Service user.
3. Last connection: date of the last connection of the Sending Service to e-file.
4. Version: when you move the mouse over the i (=information), the name of the latest Sending Service version available pops up.
5. The number indicates the Sending Service version of your current Sending Service . If you want to update your Sending Service press the download button ![]() and download the latest Sending Service version with our Sending Service installer.
and download the latest Sending Service version with our Sending Service installer.
6. If you want to close a Sending Service account, press the lock icon ![]() Deactivate.
Deactivate.
7. Group filter function in the Sending Service List
Example:
If you want to display in the Sending Service List only the Sending Services to which the Group FATCA is assigned, you have to select FATCA in the drop down list and press the SEARCH button.
8. Click the Edit groups ![]() icon to get more detailed information on the Sending Service user.
icon to get more detailed information on the Sending Service user.
Assign groups to the Sending Service user
Example:
If you want to submit COREP reportings through the Sending Service, you have to assign the group COREP to your Sending Service.
Please follow the steps below:
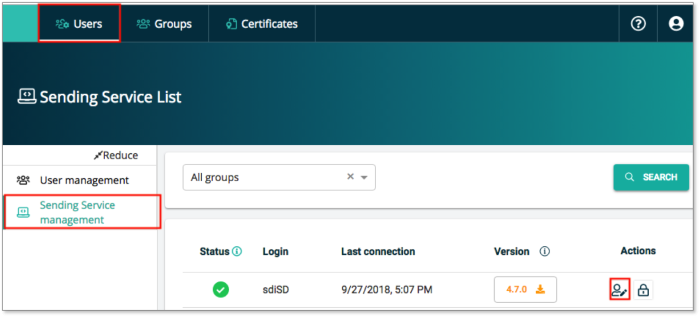
1. Select the Users tab of the Administration module and press the Sending Service Management button. The Sending Service List opens.
2.Click the Edit groups icon ![]() of the Sending Service to which you want to add the COREP group.
of the Sending Service to which you want to add the COREP group.
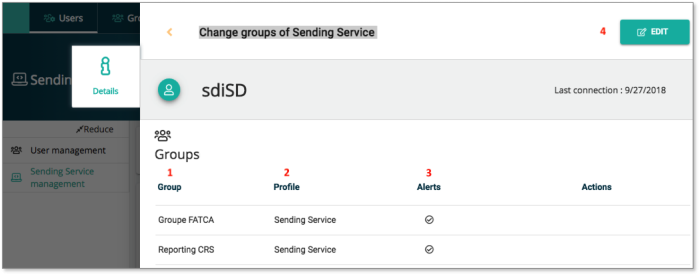
The Change groups of Sending Service page opens.
Explanations:
All Groups assigned to the Sending Service are listed here (1).
The only possible Profile value is "Sending Service" (2).
If the Alertscheckbox is checked ![]() (3), it means that the Sending Service will receive replies (= feedbacks) from the regulator. These replies will be dropped automatically into the replies respective Sending Service folder.
(3), it means that the Sending Service will receive replies (= feedbacks) from the regulator. These replies will be dropped automatically into the replies respective Sending Service folder.
4. Press the EDIT button. The Details page of your Sending Service to which you want the COREP reporting opens.
